Advanced / Automated Filtering With Formulas
☝️ Note that before trying to apply the concepts in this lesson, it would be very very smart for you to go through the “How To Handle Different Data Types In Your Liquid Snippets” lesson and ensure you understand those principles.
The reason why is that a formula like the one below will evaluate != empty differently than != '' and differently than != nil etc.
(LiquidGPT should also be able to help you creating a formula like what we’ll do here)
Below is the example from the overview page that we’ll be discussing in this lesson. (I have this formula for some of my cold outreach lists)
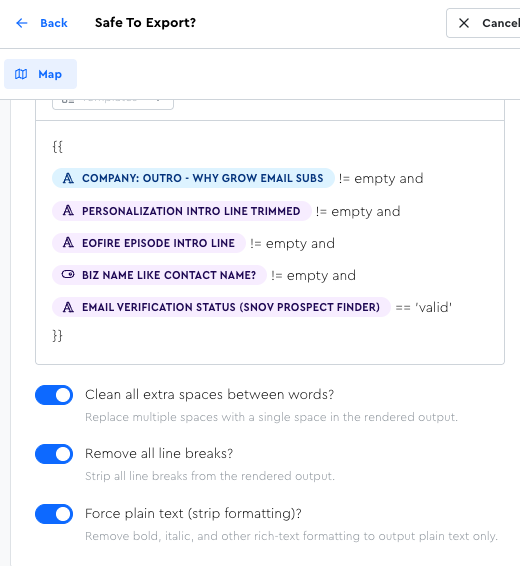
It outputs a simple true/false:
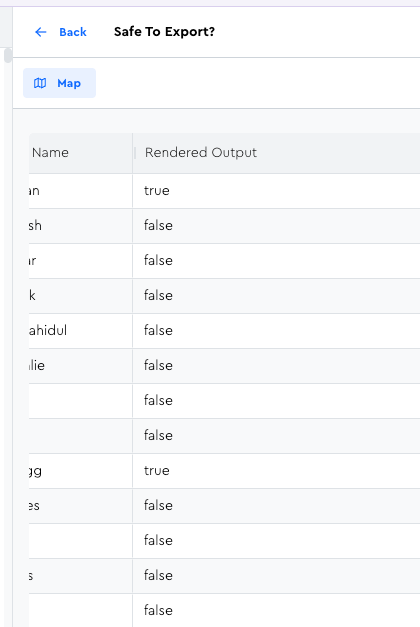
And since I have it outputting into a boolean column, I can easily filter by it to know if leads are all polished up and ready to be emailed:
Things like this are SUPER nifty, because you can essentially just compute that for your leads as a “final pass” before adding them to your campaign and sending emails, to know that you didn’t miss anything important for them.
There’s not much to learn here that you don’t already know; the main thing for you to take away here are ideas for potential use cases.
Use Case #1: Compound Filters
Ask yourself, “What compound filters / stacks of complicated filters do I want to apply that I wish were faster easier to apply & reverse?”
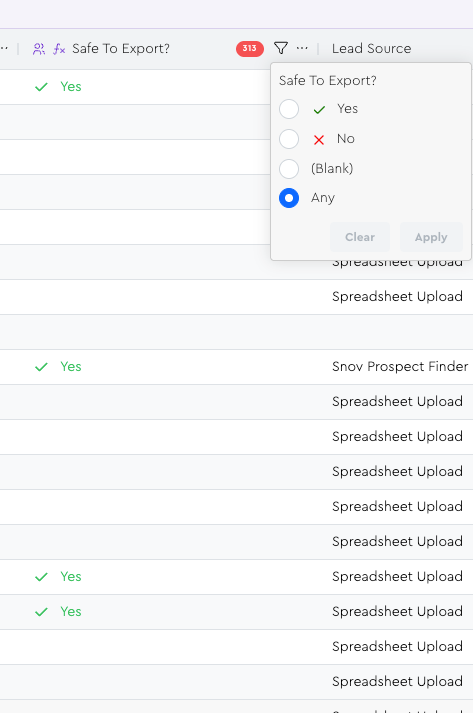
In the example above, I absolutely could have created a Saved View where I had all of those values applied, but what about when the moment comes that I want to “see all leads who are NOT yet finalized” compared to all who ARE finalized?
Well, in the Saved View approach, I’d have to literally edit every single filter to be the inverse, whereas with this, I just filter as “Safe to Export = False.”
The most important thing if you play with applications like this is to be mindful of Staleness and not trust stale Formula Output data in your table.
If you’re wanting to create something like the screenshots above for my “Safe to Export” situation, it’s pretty simple; just…
- Create a new Formula column
- Make sure the formula ideally always resolves to either “true” or “false” (or do the fancy stuff we talked about in the “How The LeadTable Column Data Types Work” lesson)
- Map it to a boolean column when finalizing
That’s it!
Use Case #2: Dynamic Tags
As of right now, tags in LeadTables are extremely powerful, but they’re also manually applied.
You have to filter your leads, select them, then apply the tag.
(One day I’d like to make an API so that we can apply tags via Make/n8n automations, but today is not that day 🙂)
But what about if you wanted to auto-tag newly-added leads who meet a set of pre-determined conditions?
(e.g. “every time I mark someone as having at least 10,000 website visitors a month, score them as a hot lead”)
This is where Formulas can be nifty. Similar to Use Case #1, you can create a formula that either outputs specific string values, or number values, or whatever, and then save their filters into different views, use them for personalization, etc.
Use Case #3: The Sky Is The Limit!
There are infinite use cases for this that aren’t occurring to me right now; with the power of Liquid straight in your table, you can do probably anything you could ever want for lead scoring, ICP filtering, or personalization — with the right formula.
If you describe what you want to accomplish to LiquidGPT he can probably help you get ideas (you could paste this lesson into the chat to give him further context, too).