How To Upload & Merge Enrichment For Companies
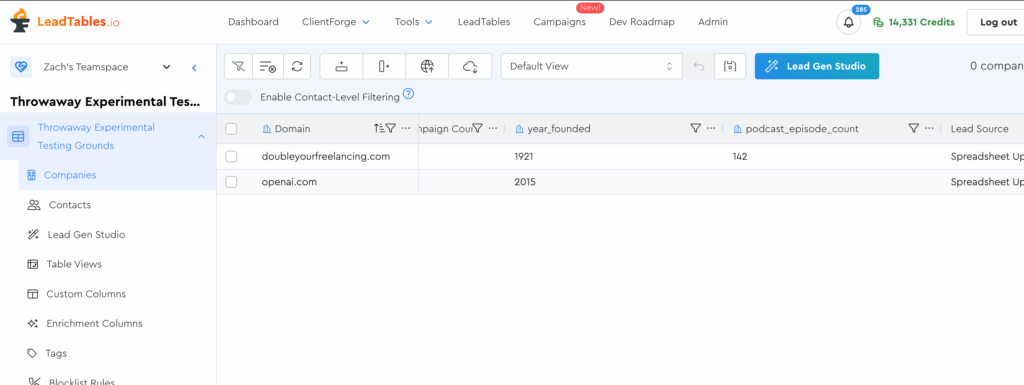
Where we left off, we’d uploaded the initial sample data to the test LeadTable:
Now let’s say you exported those leads and ran them through some sort of website traffic checker tool, and now you want to upload that traffic info to LeadTables and merge it into the existing records.
This is where “enrichment uploading” comes into play.
Fortunately for you, LeadTables makes this a breeze.
Back in the “google sheet days,” this kind of operation would be an error-prone nightmare if your two data sources had rows in different orders, but with LeadTables, your enrichment uploads will auto-match based on the unique identifier.
Download the example enrichment spreadsheet from the resources on this page to get started.
Then go to the uploader on your “Throwaway Experimental Testing Grounds” LeadTable.
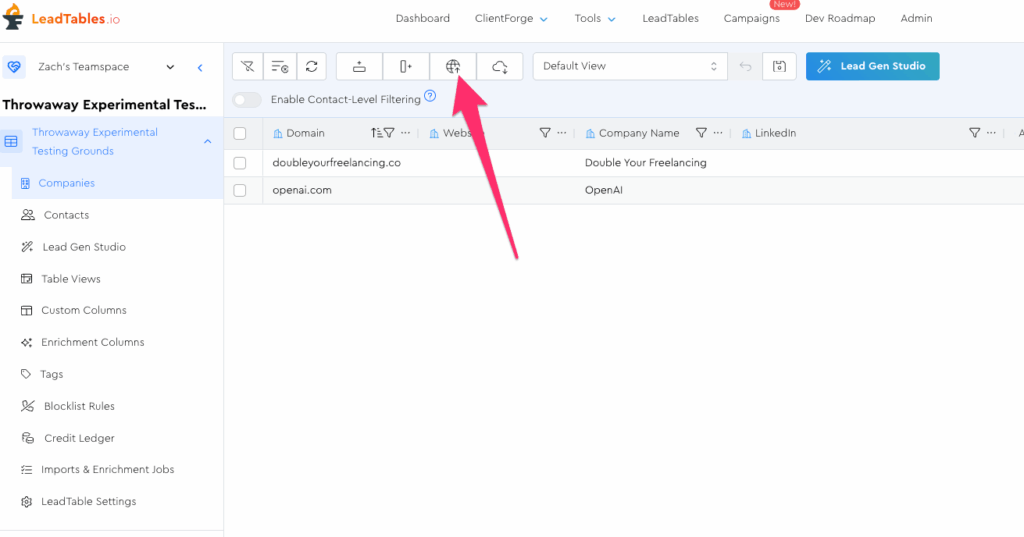
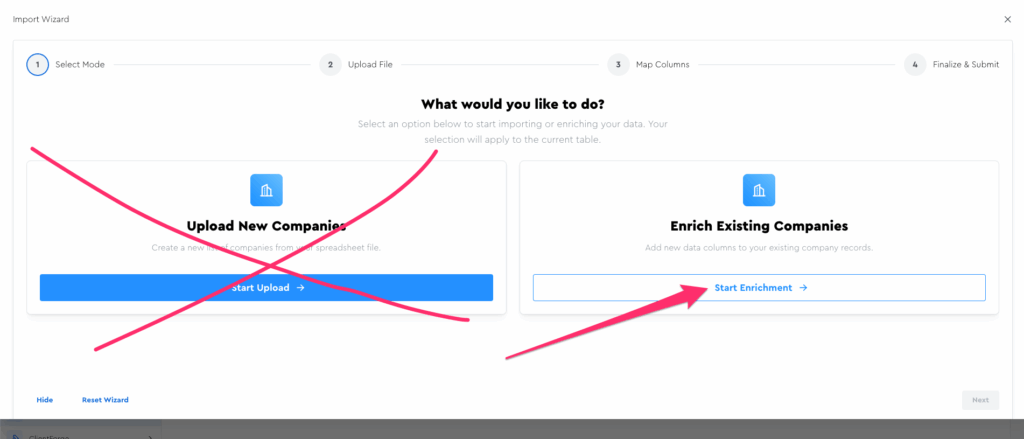
But this time, in the Upload Wizard modal window, we want to use “Enrichment Mode” instead of “Upload Mode”:
Quick side note…
The Difference Between Enrichment Mode & Upload Mode
LeadTables has smart merging features even in upload mode, so for today’s example, you actually could have used either upload mode OR enrichment mode and it would have worked the same way.
BUT it’s still good to understand how they fundamentally work.
Here’s the #1 difference between the two:
- Enrichment mode will ONLY add data to pre-existing leads in the table.
- Upload mode will add new leads if they don’t exist yet.
Where this matters:
- Suppose you have two leads in your LeadTable that you want to enrich.
- You have a csv containing data for those two leads — along with 500 others.
- You do NOT want to import the 500 others, and you also don’t want to weed through the CSV looking for these 2 rows.
- This is when you use enrichment mode!
- Only the 2 “needles in the haystack” will be enriched. The other 500 will be skipped over.
So back to our example; your example sheet actually has 3 rows in it. If you do “upload mode,” 2 will enrich and one will get added fresh.
If you do “enrichment mode,” two will enrich and one will be ignored.
So that said, click enrichment mode and upload as normal.
On the mapping page, we can see that this sheet didn’t contain domains (e.g. website.com) and instead contains ugly-ass URLs. So we want to make sure we map those to the “Website URL” option, to take advantage of LeadTables’ automatic url→domain parsing:
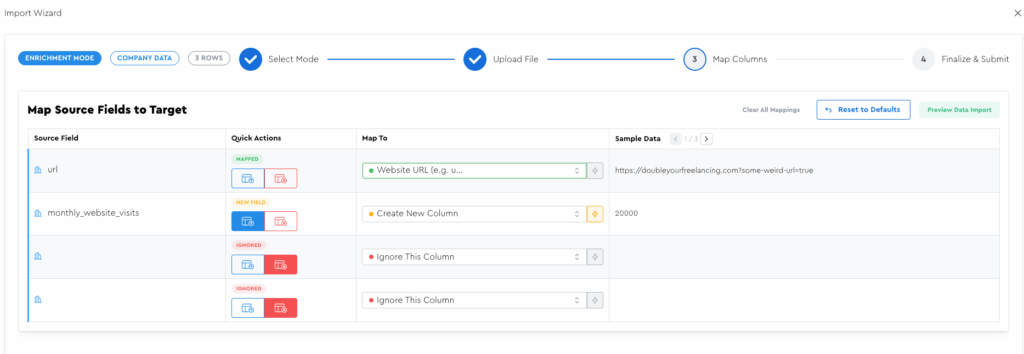
Make sure your monthly website visits are mapped to a new field, then click “Next.”
On the finalization step, the only thing you need to change is changing the new field to a number data type:
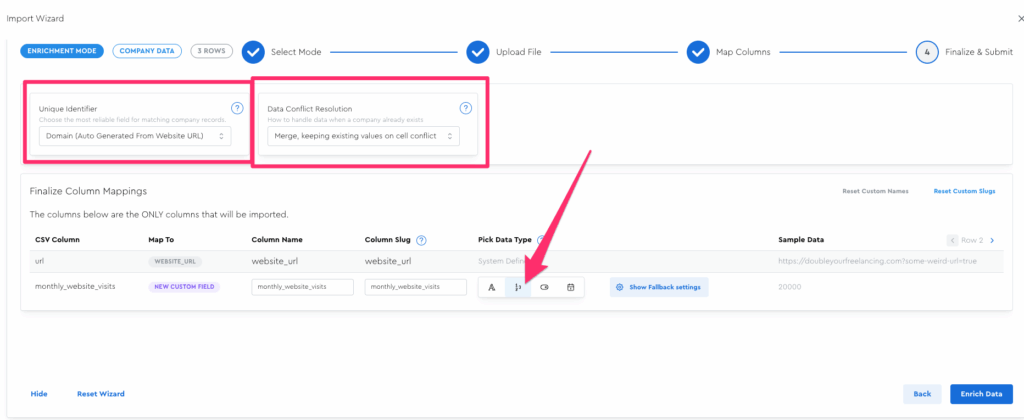
But I want to take a moment to talk about the two boxes I drew in that screenshot. (”Unique Identifier” and “Data Conflict Resolution”)
Unique Identifier
We covered this in an earlier lesson. The TL/DR is that it’s what’s used to match this data we’re uploading now to pre-existing data.
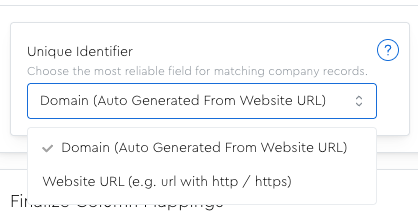
You pretty much should always choose domain / auto-generated domain over website URL as your unique identifier.
The reason why is that if your source file here contains “https://doubleyourfreelancing.com?some-weird-url=true” as the url, and you choose website URL as the unique identifier, it will require an exact match in the table in order to map.
This means if you have a lead in the table with a url of “https://doubleyourfreelancing.com” (and NOT the “?some-weird-url=true” at the end) it will NOT match.
Whereas if you use the auto-generated domain, it’ll parse down to “doubleyourfreelancing.com” which WILL match.
The main time you’d want to match on website URL would be if you were doing something like social media outreach lead management, where you need to distinguish socialnetwork.com/person1 from socialnetwork.com/person2.
Data Conflict Resolution / Merge Strategy
In “Enrichment Mode” you only have 2 options:
- Merge, favor existing: Add new fields while keeping existing values for any cell conflicts.
- Merge, favor new: Add new fields and overwrite old values with new values for any cell conflicts.
Whereas if you were in “Upload Mode” you would have had 4 options:
- Merge, favor existing: Add new fields while keeping existing values for any cell conflicts.
- Merge, favor new: Add new fields and overwrite old values with new values for any cell conflicts.
- Skip: Don’t modify existing records, only import new ones.
- Keep both: Keeps both rows, resulting in duplicate records in the table.
The default (”Merge, favor existing”) is usually the right call, but it depends whose data you trust more in the event of a conflict.
With all this covered, you can now click the “Enrich Data” button to run the upload.
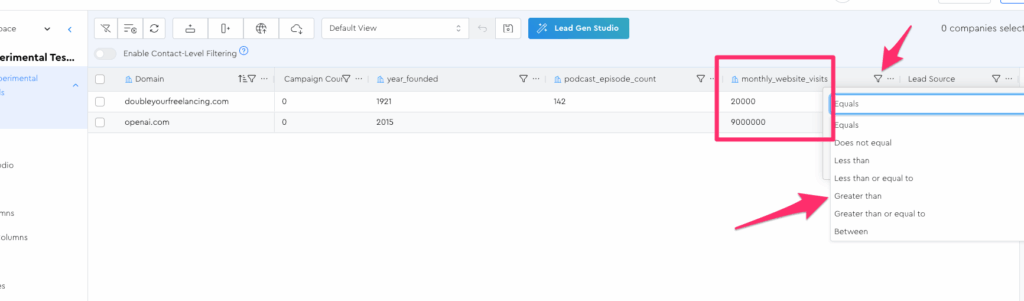
If you did everything correctly, you should see…
- Your new column in the table
- With lead data matched up correctly
- And number-style filter options
- And only the two rows
That concludes this enrichment step, but if you wanted to now upload this same sheet in “Upload Mode” to see what I mean about that third lead getting added, that could be a good way to solidify your knowledge.